Build NeurEco Compression model with the GUI
Contents
Build NeurEco Compression model with the GUI#
Fill in the Settings tab, the build parameters are explained in the table below:
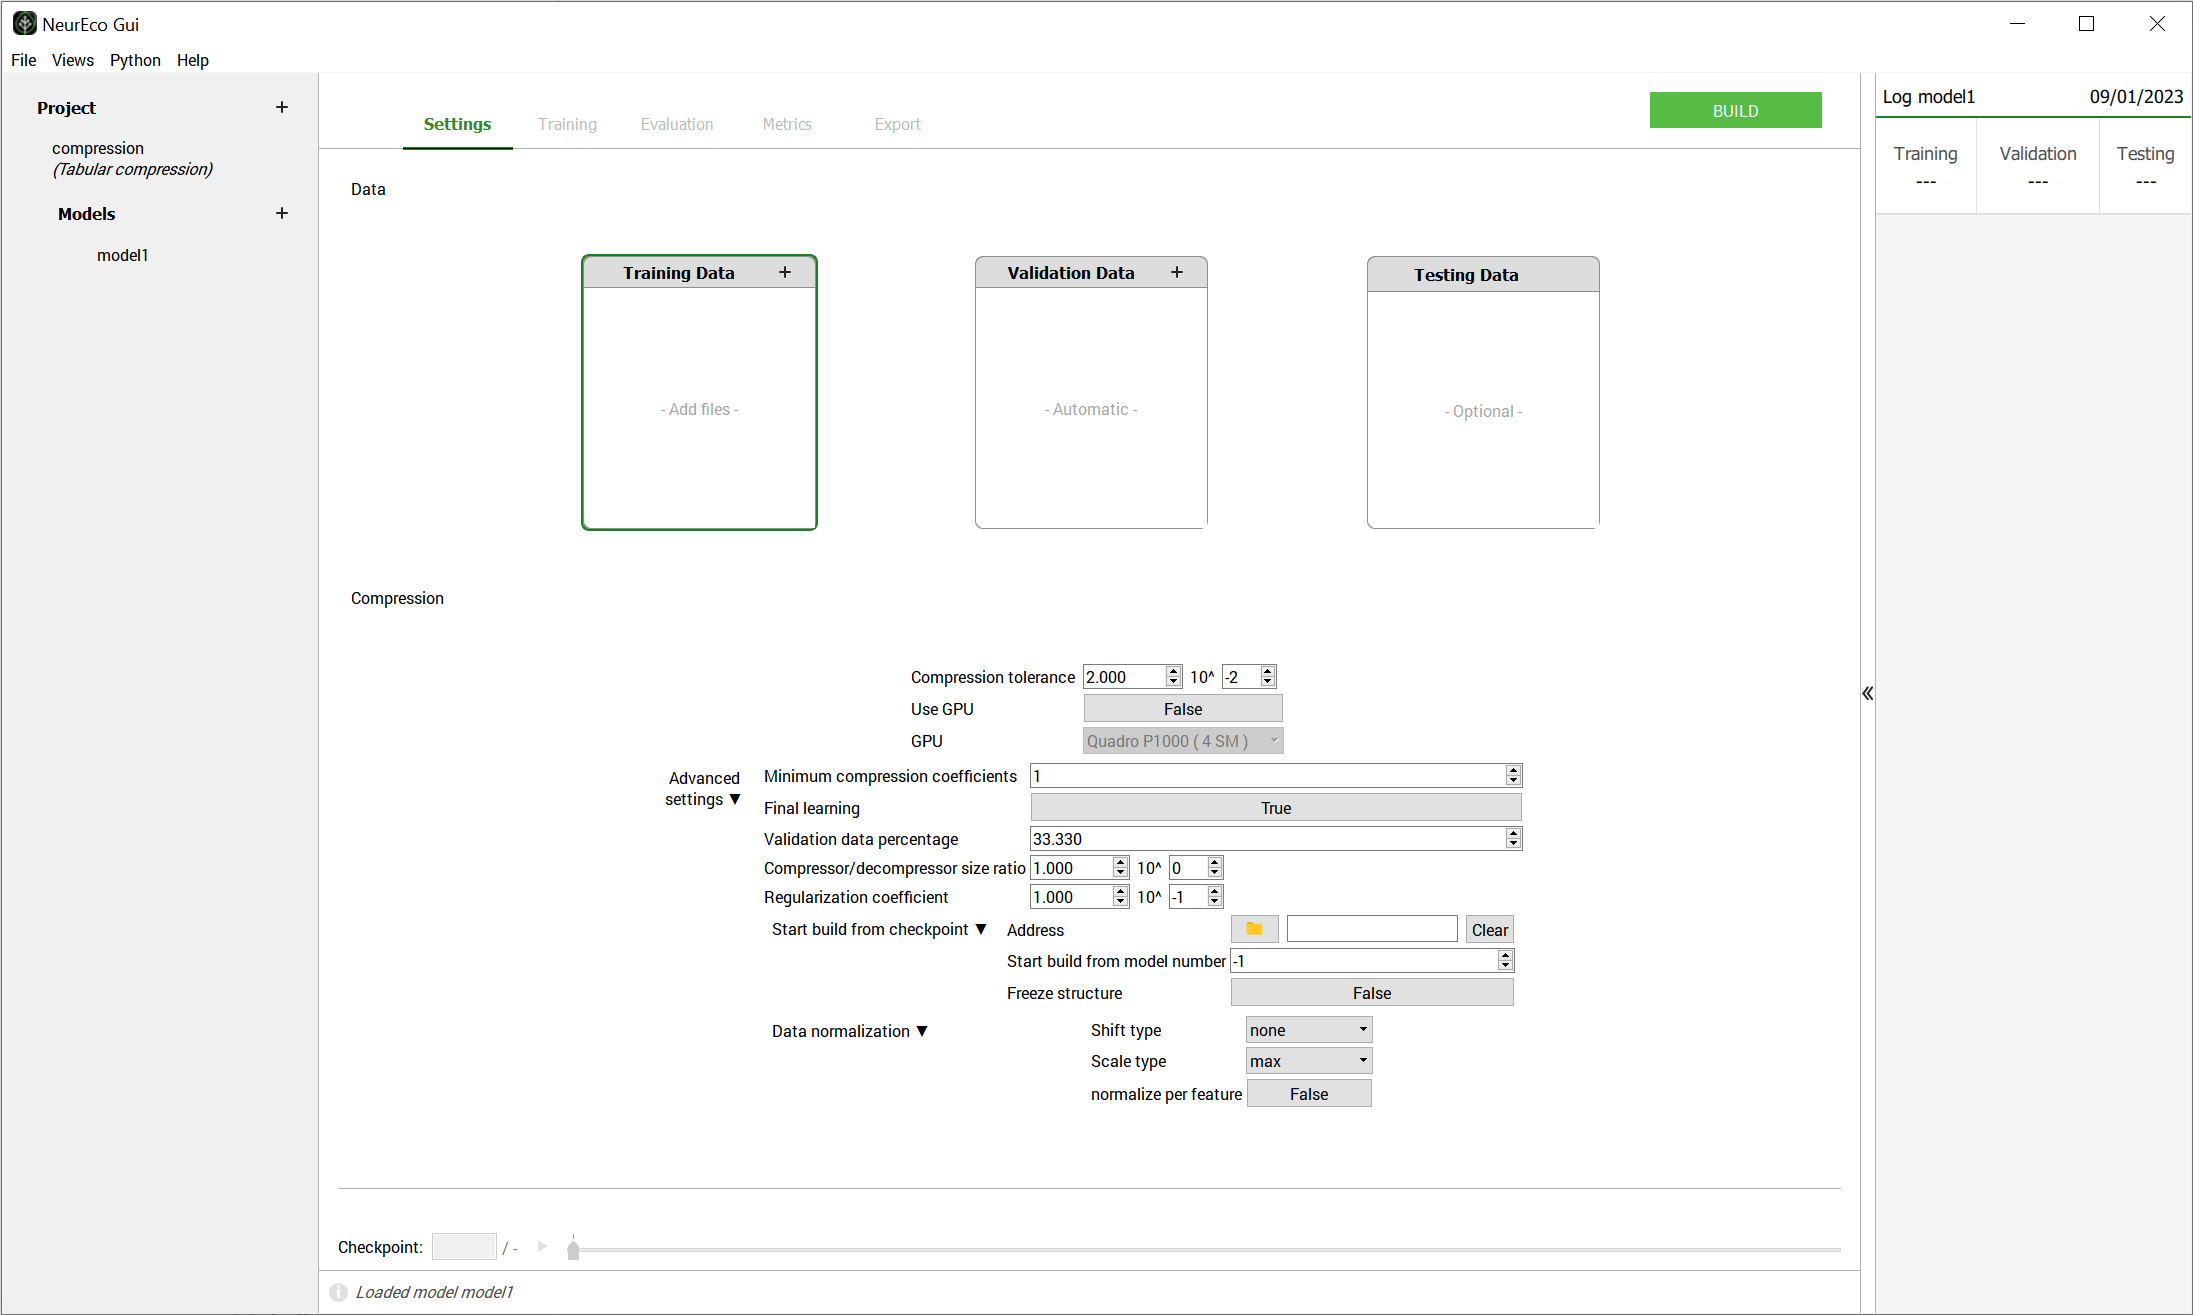
Settings to build a Compression model#
Press Build button
Once the Build started, the Training, Evaluation, Metrics and Export panels become available. The moment the first model is saved to the checkpoint, these panels can be used as usual.
Build parameters#
Name |
Description |
|---|---|
Training Data |
Required. Data used to train a model. Click on Add files and choose paths to the files prepared according to Data preparation for NeurEco Compression with GUI |
Validation Data |
Optional. Data used to validate a model. If not provided, the Validation Data are chosen automatically among the provided samples in Training Data |
Testing Data |
Optional. Data never used during the training process. If provided, allow to monitor the model performance on the test data during the Build. |
Compression tolerance |
float, default=0.02, specifies the tolerance of the compressor: the maximum error accepted when performing a compression and a decompression on the validation data. |
Use GPU |
If True, GPU is used during the Build |
GPU |
If Use GPU is True, determines which GPU is used among available |
Advanced parameters#
Name |
Description |
|---|---|
Minimum compression coefficients |
Specifies the minimum number of nonlinear coefficients, when this number is reached NeurEco stops the reducing the number of neurons on the bottleneck of Compression neural network. |
Final learning |
If set to True, NeurEco includes the validation data into the training data at the very end of the learning process and attempts to improvement the results. |
Validation data percentage |
Optional, default is 33.33%. Percentage of the data that NeurEco will select to use as Validation Data. The minimum value is 10%, the maximum value is 50%. Ignored when Validation Data are provided. |
Compressor/decompressor size ratio |
Float, optional, default = 1.0, specifies the ratio between the sizes of the compression block and the decompression block. This number is always bigger than 0 and smaller or equal to 1. Note that this ratio will be respected in the limit of what NeurEco finds possible. |
Regularization coefficient |
Float, optional, default = 0.1. The initial value of the regularization parameter. |
Start build from checkpoint: Address |
path to the checkpoint file, resumes the Build starting from already created model (it can be used for changing or adding training and validation data) |
Start build from checkpoint: Start build from model number |
When Start build from checkpoint: Address is not empty, specifies which intermediate model in the checkpoint will be used as a starting point. When set to -1, NeurEco will choose the last model in the checkpoint. The model numbers should be in the interval [0, n[ where n is the total number of networks in the checkpoint. |
Start build from checkpoint: Freeze structure |
When Start build from checkpoint: Address is not empty, NeurEco will only change the weights (not the network architecture) if this variable is set to True. |
Data normalization for Tabular Compression#
Name |
Description |
|---|---|
Input normalization: Shift type |
default = “none”. Possible values: “mean”, “min_centered”, “auto”, “none”. See table bellow for more details. |
Input normalization: Scale type |
default = “max”. Possible values: “max”,”max_centered”, “std”, “auto”, “none”. See table bellow for more details. |
Input normalization: Normalize per feature |
default for Compression = False. Normalize all input together. If set to True, normalize each input feature independently from others. |
NeurEco can build an extremely effective model just using the data provided by the user, without changing any one of the building parameters. However, the right normalization, based on the knowledge of the data’s nature, makes a big difference in the final model performance.
Set normalize per feature to True if trying to fit targets of different natures (temperature and pressure for example) and want to give them equivalent importance.
Set normalize per feature to False if trying to fit quantities of the same kind (a set of temperatures for example) or a field.
If neither of these options suits the problem, normalize the data your own way prior to feeding them to NeurEco (and deactivate output normalization).
A normalization operation for NeurEco is a combination of a \(shift\) and a \(scale\), so that:
Allowed shift methods for NeurEco and their corresponding shifted values are listed in the table below:
Name |
shift value |
|---|---|
none |
\[0\]
|
min |
\[min(x)\]
|
min_centered |
\[-0.5 * (min(x) + max(x))\]
|
mean |
\[mean(x)\]
|
Allowed scale methods for NeurEco Tabular and their corresponding scaled values are listed in the table below:
Name |
scale value |
|---|---|
none |
\[1\]
|
max |
\[max(x)\]
|
max_centered |
\[0.5 * (max(x) - min(x))\]
|
std |
\[std(x)\]
|
Normalization with auto options:
shift is mean and scale is max if the value of mean is far from 0,
shift is none and scale is max if the calculated value of mean is close to 0
If the normalization is performed by feature, and the auto options are chosen, the normalization is performed by group of features. These groups are created based on the values of mean and std.
Particular cases of Build for a Tabular Compression#
Select a model from a checkpoint and improve it#
At each step of the training process, NeurEco records a model into the checkpoint. It is possible to explore the recorded models via the checkpoint slider in the bottom of the GUI. Sometimes an intermediate model in the checkpoint can be more relevant for targeted usage than the final model with the optimal precision (for example if it gives a satisfactory precision while being smaller than the final model with the optimal precision and thus can be embedded on the targeted device).
It is possible to export the chosen model as it is from the checkpoint, see Export NeurEco Compression model with GUI.
The model saved via Export does not benefit from the final learning, which is applied only at the very end of the training.
To apply only the final learning step to the chosen model in the checkpoint:
Right click on the current model in the Project section of the GUI and choose to Clone it
Change Advanced Settings for this cloned model:
Start build from checkpoint: Address: path to the checkpoint file of the initial model
Start build from checkpoint: Start build from model number: choose the model among saved in the checkpoint
Freeze structure: True
Start Build
Control the size of the NeurEco Compression model during build#
This figure shows the compression/decompression models generated by a standard NeurEco Tabular compression. The number of links is well balanced between compression and decompression. However, if the user chooses to, that balance could be shifted to create a smaller compressor like shown in the figure below:
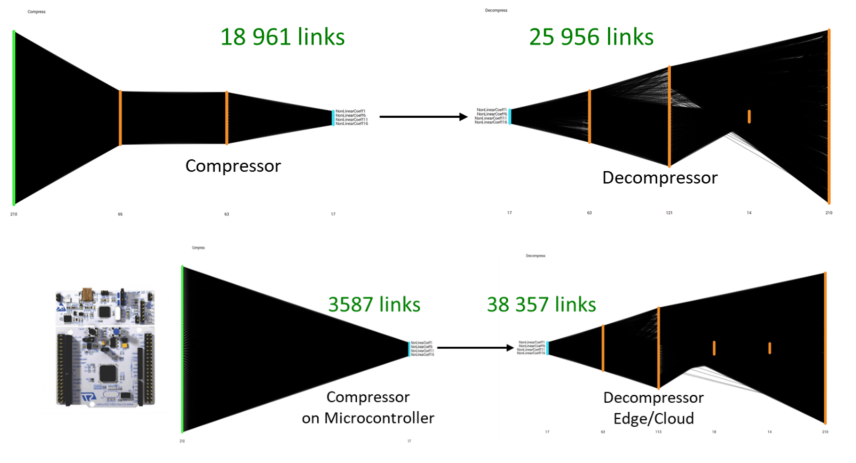
Controlling the size of a compression model#
Note
The size of the compressor running on a microcontroller is reduced, while the size of the decompressor is increased
For a detailed example of the usage of this option, see Tutorial: control the size of a Compression model.